The Best Fluffy Pancakes recipe you will fall in love with. Full of tips and tricks to help you make the best pancakes.
How to Diagnose Cannabis Leaf Symptoms
Growing cannabis can be both an art and a science, and your plants will show signs when something’s off. Leaves, in particular, are like little warning lights, giving you hints about what’s going wrong with your plants. Yellowing, curling, or spots on the leaves? No worries! I’ve got you covered with a guide on how to diagnose cannabis leaf symptoms. Let’s jump right in and help you understand what your plants are trying to tell you.
Common Causes of Cannabis Leaf Symptoms
When something goes wrong with your cannabis plants, the leaves are usually the first to show it. The main causes can range from nutrient deficiencies to pests and environmental stress. Understanding the root cause will help you figure out the right fix.
Nutrient Deficiencies
Nutrient deficiencies can seriously mess with your plant’s ability to thrive. You’ll notice discolored leaves, stunted growth, or even wilting. Each deficiency has its own telltale signs, which we’ll dive into in more detail later.
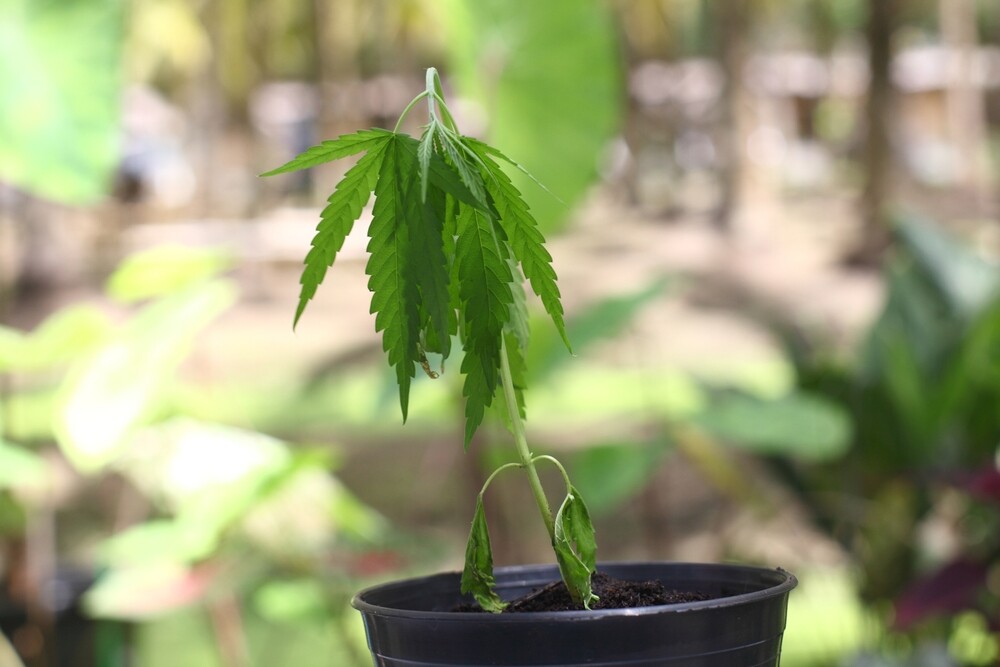
Overwatering or Underwatering
Too much or too little water can lead to major issues with your leaves. Overwatering often causes leaves to look swollen and droopy, while underwatering can make them curl and become crispy. Finding the right balance is key.
pH Imbalances
Your plants are picky when it comes to the pH level of the soil. If it’s too high or too low, the plant won’t absorb nutrients properly. This leads to all sorts of problems, which often show up on the leaves.
Pests and Diseases
No one likes finding bugs on their weed plants. Common pests like spider mites, aphids, or diseases like powdery mildew can cause spots, discoloration, and other issues on your leaves. Getting rid of these invaders is crucial to keep your plant happy.
Environmental Stress (Temperature, Humidity, Light)
Too much heat, not enough humidity, or lights that are too close can make your cannabis plant’s leaves freak out. You’ll notice symptoms like burning, curling, or crispy edges. Keeping your grow room conditions in check will prevent these issues.
How to Identify Nutrient Deficiencies in Cannabis Leaves
Now, let’s get into the nitty-gritty of nutrient deficiencies. Each nutrient plays a different role, and its absence leaves distinct symptoms on your plant’s leaves.
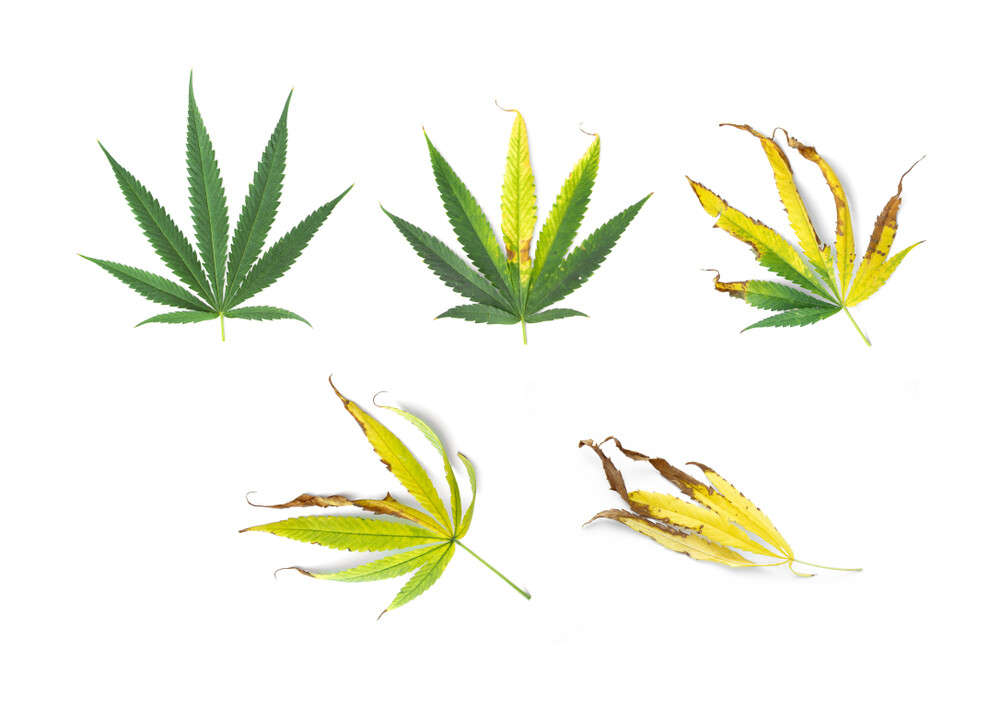
Nitrogen Deficiency Symptoms
Nitrogen deficiency is a common problem, especially during the flowering stage. If the lower leaves turn yellow and drop off, you’ve likely got a nitrogen issue on your hands. Nitrogen is essential for growth, so fix it fast!
Phosphorus Deficiency Symptoms
Phosphorus is critical for photosynthesis and energy transfer in plants. If your leaves are turning dark with purplish or brown patches, that’s a classic phosphorus deficiency. You might also see stunted growth.
Potassium Deficiency Symptoms
Potassium is key for water regulation, so a lack of it will cause brown edges and spots on your leaves. The leaves might also curl up, looking like they’re suffering from heat stress, but potassium deficiency is to blame.
Magnesium Deficiency Symptoms
When your plant is lacking magnesium, you’ll notice yellowing between the veins on older leaves. The green veins with yellowed areas in between is a dead giveaway for magnesium deficiency.
Calcium Deficiency Symptoms
Calcium deficiencies show up as brown or bronze spots and crinkled leaves. The newer leaves will be most affected, and you’ll also see weak stems if calcium is in short supply.
Iron Deficiency Symptoms
Iron deficiency causes yellowing in the newest leaves while the veins remain green. It’s not super common, but when it happens, the plant’s growth can stall.
Sulfur Deficiency Symptoms
If your leaves are turning pale yellow, particularly starting from the new growth, you could have a sulfur deficiency. Unlike nitrogen deficiencies, this starts at the top of the plant.
Diagnosing Watering Issues in Cannabis Plants
Watering is a tricky balance, but the symptoms will tell you whether you’re over or underwatering.
Signs of Overwatering
Overwatering can make your leaves droop and feel heavy. You might also see yellowing or browning leaves at the bottom of the plant. The soil will be soggy, which suffocates the roots.
Signs of Underwatering
Underwatering symptoms are easier to spot: the leaves will curl up and become crispy or brittle. The soil will be bone dry, and your plant will look sad and wilted.
Best Practices for Watering Cannabis Plants
Water when the top inch of soil feels dry, and ensure your pots have proper drainage. It’s better to water deeply but less often. This helps your roots grow strong and keeps the leaves looking healthy.
pH Imbalances and Their Effect on Cannabis Leaves
Cannabis plants need the right pH range to absorb nutrients properly. A pH imbalance will prevent that, leading to a variety of leaf symptoms.
Symptoms of pH Imbalance
Yellowing leaves, slow growth, and nutrient lockout are all symptoms of a pH imbalance. The leaves may also show random spotting or discoloration that doesn’t match a typical nutrient deficiency.
How to Measure and Adjust Soil pH
Use a pH meter to test the pH of your soil or water. Ideal pH ranges are between 6.0 and 7.0 for soil, and 5.5 to 6.5 for hydroponics. You can adjust pH by adding pH up or down solutions to your water.
Ideal pH Ranges for Cannabis Cultivation
In general, keeping your soil pH between 6.2 to 6.8 will allow the best nutrient absorption for cannabis plants. Anything outside this range can cause nutrient lockout, leading to various leaf problems.
Identifying and Treating Common Pests and Diseases
Pests and diseases can wreak havoc on your plants if you don’t catch them early. Here are the main culprits.
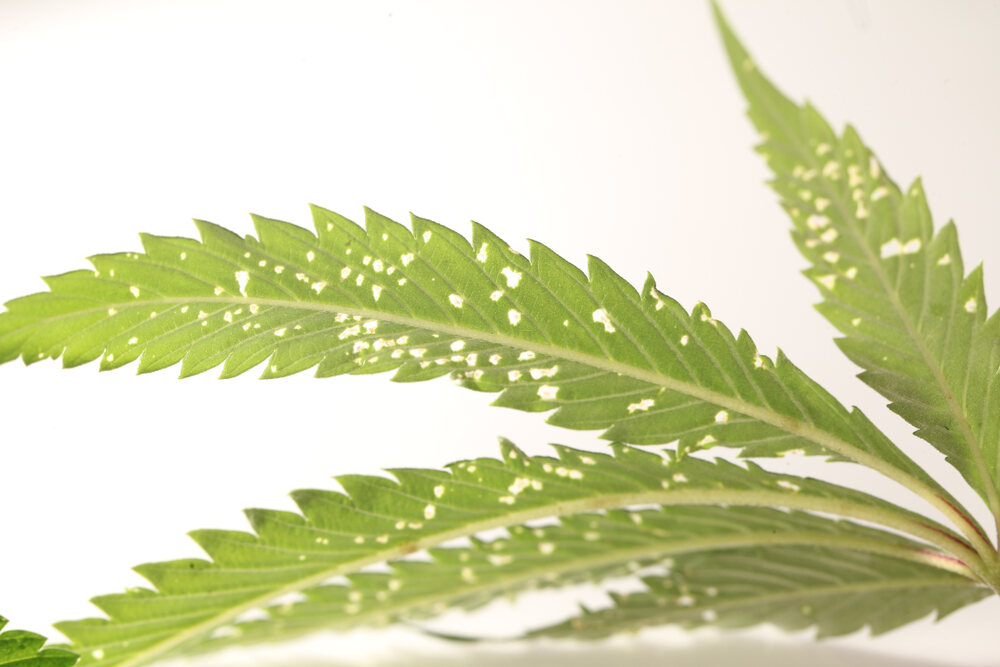
Spider Mites
Spider mites leave tiny white or yellow speckles on the leaves. In severe cases, you’ll see webbing. A good spray of neem oil or insecticidal soap can help get rid of them.
Thrips
Thrips suck the juices out of your plant leaves, leaving silver or bronze streaks. They multiply fast, so take action as soon as you see signs, using neem oil or predatory insects.
Powdery Mildew
If you spot a white powdery substance on your leaves, it’s powdery mildew. This fungal disease thrives in humid conditions. Prune affected leaves and increase airflow to prevent it from spreading.
Root Rot
Root rot is caused by overwatering and poor drainage. The leaves will turn yellow, wilt, and eventually die off. Fixing your watering habits and using beneficial bacteria can help prevent and treat root rot.
Aphids
Aphids are small, soft-bodied insects that suck sap from your plant’s leaves. They can cause curling and yellowing leaves. Ladybugs are natural predators, or you can use insecticidal soap to get rid of them.
Environmental Factors That Can Impact Leaf Health
Environmental stress can also show up in your plant’s leaves. Here’s how to spot issues caused by your grow room setup.
Light Burn Symptoms and Solutions
Light burn happens when your grow lights are too close to the plants. You’ll notice bleached spots, usually on the top leaves closest to the light. To fix this, just raise your lights or reduce the intensity.
Heat Stress Symptoms and Solutions
Heat stress causes leaves to curl up like tacos and can make the edges turn brown and crispy. If it’s too hot in your grow space, increase airflow and lower the temperature to keep your plants comfortable.
Humidity Levels and Their Effect on Leaf Health
Too much humidity can cause mold, while too little can lead to dry, brittle leaves. The ideal range is around 40-60% during the vegetative stage and lower during flowering.
Wind Burn Symptoms and Solutions
If you’ve got fans blasting directly onto your plants, wind burn can happen. The leaves will curl or get brown, crispy edges. Just adjust the fans so they’re not blowing directly on your plants.
FAQ:
What do yellowing cannabis leaves mean?
Yellowing leaves can be a sign of many things: nutrient deficiencies, overwatering, pH issues, or pests.
How do I fix curling cannabis leaves?
Curling can be caused by heat stress, overwatering, underwatering, or nutrient issues. Identify the cause and adjust accordingly.
Why are the tips of my cannabis leaves turning brown?
Brown tips are often a sign of nutrient burn or potassium deficiency.
What causes cannabis leaves to turn purple?
Purple leaves can be a genetic trait, but if it’s unexpected, it could be a sign of phosphorus deficiency or cold stress.
How can I prevent leaf symptoms from worsening?
Monitor your plants daily, adjust watering and nutrient levels, and keep your grow environment stable to prevent leaf symptoms from getting worse.
That’s a wrap! Now you’re ready to take on any cannabis leaf symptom like a pro. Keep an eye on your plants, make adjustments when needed, and you’ll have healthy, happy plants in no time.